整套web环境搭建

install php5.3

  • 安装运行依赖包&下载php5.3 tar包
1
2
3
4
5
$ yum -y install epel-release && yum -y groupinstall 'Development Tools'
$ yum -y install libxml2-devel libcurl-devel libjpeg-devel libpng-devel freetype-devel libmcrypt-devel openssl-devel libtool-ltdl-devel
$ cd ~/tmp
$ wget http://cn2.php.net/distributions/php-5.3.29.tar.gz
$ tar zxvf php-5.3.29.tar.gz && cd php-5.3.29
  • 配置资源
1
$ ./configure --prefix=/opt/php-5.3.29 --with-config-file-path=/opt/php-5.3.29/etc --enable-fpm --with-mysql=mysqlnd --with-mysqli=mysqlnd --with-pdo-mysql=mysqlnd --with-iconv-dir --with-zlib --with-libxml-dir --enable-xml --with-curl --with-openssl --with-mhash --with-xmlrpc --with-gettext --with-freetype-dir --with-jpeg-dir --with-png-dir --with-gd --enable-gd-native-ttf --with-mcrypt --enable-bcmath --enable-shmop --enable-exif --enable-sysvsem --enable-mbregex --enable-mbstring --enable-sockets --enable-ftp --enable-zip --enable-soap
  • 编译&安装
1
make && make install
  • 设置相关配置
1
2
3
4
5
6
$ cp php.ini-production /opt/php-5.3.29/etc/php.ini
$ cp /opt/php-5.3.29/etc/php-fpm.conf.default /opt/php-5.3.29/etc/php-fpm.conf
$ cp sapi/fpm/init.d.php-fpm /etc/init.d/php53-fpm
$ chmod 755 /etc/init.d/php53-fpm
$ chkconfig php53-fpm on
$ /etc/init.d/php53-fpm start

安装nginx

  • 安装nginx1.12.0版本所以要配置最新的yum源;接下来就是安装运行了。
1
2
3
4
5
6
7
$ vi /etc/yum.repos.d/nginx.repo
[nginx]
name=nginx repo
baseurl=http://nginx.org/packages/centos/7/$basearch/
gpgcheck=0
enabled=1
$ yum -y install nginx

安装Percona Server 5.7

  • 安装percona仓库源
1
yum install http://www.percona.com/downloads/percona-release/redhat/0.1-4/percona-release-0.1-4.noarch.rpm
  • 检验安装是否成功||直接安装服务
1
2
3
$ yum list | grep percona
$ yum install -y Percona-Server-server-57
$ service mysql start
  • NOTE要点
  1. 临时密码存放在/var/log/mysqld.log,执行以下便得到
1
cat /var/log/mysqld.log | grep "temporary password"
  1. 必须更改root临时密码,执行以下&&按照提示操作更改密码
1
sudo /usr/bin/mysql_secure_installation

服务器关闭密码登录&&配置ssh

创建用户并设置。分配拥有sudo用户组

1
2
3
4
5
6
7
8
$ useradd example_user && passwd example_user
$ usermod -aG wheel example_user
#创建授权目录
$ mkdir ~/.ssh
$ echo>~/.ssh/authorized_keys
$ chmod 700 ~/.ssh
$ chmod 600 ~/.ssh/*

执行&配置ssh相关操作

  • 在本机生成密钥执行以下命令
1
ssh-keygen -b 4096

出现如图
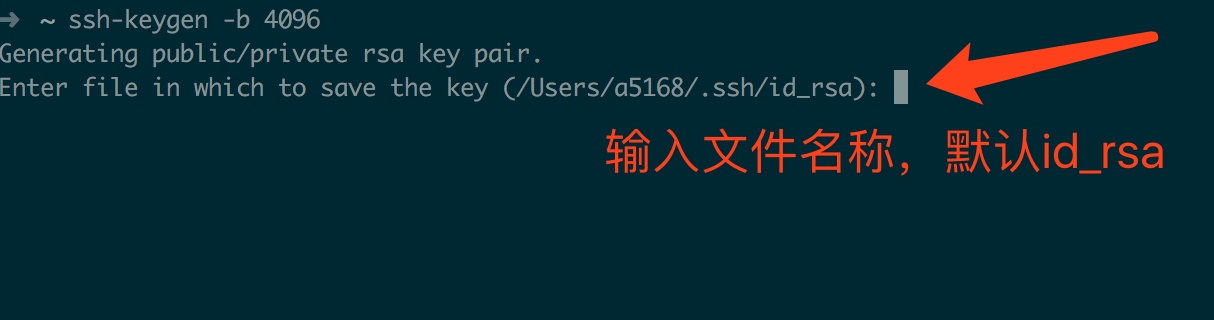
回车将要求你填入一个key密码;按提示执行之后将生成私钥test、公钥test.pub文件

  • 将生成好test.pub传到服务器
1
scp ~/.ssh/test.pub ssh user@ip:~/.ssh/authorized_keys
  • 登录到服务器编辑sshd_config文件
1
2
3
4
5
6
7
8
9
#更改/etc/ssh/sshd_config内容
$ vi /etc/ssh/sshd_config #编辑以下内容
Port 1688 #把端口设为1688
RSAAuthentication yes #把#去掉
PubkeyAuthentication yes 把#去掉
PasswordAuthentication no #设置为no
PermitRootLogin no #如果不想让root登录改为no,note无密钥测试登录成功再修改此项。
$ service sshd restart #重启sshd服务

进行ssh无密钥连接服务器

本机用Sublime打开 sbul ~/.ssh/config 尾部添加以下内容:

1
2
3
4
5
6
Host sexy #别名
HostName ip #ip地址
Port 1688 #端口;上边更改过来的端口
User sexbody #登录用户名
PreferredAuthentications publickey
IdentityFile ~/.ssh/test #上边创建的test私钥文件

iTerm终端执行ssh sexy #上边config文件添加的别名;将出现以下信息。输入刚才创建ssh-keygen时的密码。连接成功
出现如图

使用gitolite创建git服务仓库

  • 根据上边操作生成名为git的ssh-key,然后上传到服务器/tmp目录备用
1
scp git.pub ssh sexy:/tmp
  • 创建只具有读写的系统账号
1
2
3
$ useradd --system --shel /bin/bash --create-home git
$ usermod -u 600 git
$ cp /tmp/git.pub /home/git/ #把公钥复制git用户目录备用
  • 切换到刚创建git用户&&创建bin目录
1
2
3
$ su - git
$ pwd #或者echo $HOME; 校验是不是已经切到git用户目录
$ mkdir -p ~/bin
  • 克隆gitolite源码&&安装
1
2
3
git clone git://github.com/sitaramc/gitolite
gitolite/install -ln ~/bin
gitolite setup -pk git.pub #刚才复制到此目录的公钥
  • 本地配置.ssh/config并进行别名连接配置
1
git clone git:gitolite-admin #克隆权限管理与仓库管理回来

至此整个服务已经搭建好。